Shopify customer events
Summary
This document provides a comprehensive guide on integrating Google Analytics (GA) with Shopify, utilizing Shopify's new customer event feature. It includes instructions for blocking non-GA cookies (specifically Shopify customer cookies) and ensuring compliance with pixel tracking, given that our inbuilt Consent Management Platform (CMP) banner manages all necessary permissions.
Introduction
This guide details the configuration of Google Analytics (GA) on a Shopify store using the new customer event feature. Additionally, it outlines steps to block Shopify customer cookies while ensuring that the GA pixel operates correctly.
Prerequisites
Before you begin, ensure you have the following:
-
A Google Analytics account and tracking ID.
-
Access your Shopify store with permission to modify themes.
-
Understanding of Shopify's new customer event feature.
-
Access to the inbuilt CMP (Springer Nature Consent Management Platform) banner system.
Setup instructions
1. Blocking shopify customer privacy cookies
To prevent Shopify from setting its customer cookies while retaining GA functionality, insert the following code snippet into your theme. This ensures that only GA tracking cookies are utilized:
/* reject Shopify marketing & analytics cookies. !! START*/
window.Shopify.loadFeatures(
[
  {
    name: 'consent-tracking-api',
    version: '0.1',
  },
],
  error => {
    if (error)
      {
        console.log("consent-tracking-api failed. " + error)
      }
      // If the error is false, the API is loaded and ready to use!
        window.Shopify.customerPrivacy.setTrackingConsent({
          "analytics":    false,
          "marketing":    false,
          "preferences":  false
        },
         () => console.log("Consent captured")
        );
  },
);
/* reject Shopify marketing & analytics cookies.  !! END*/
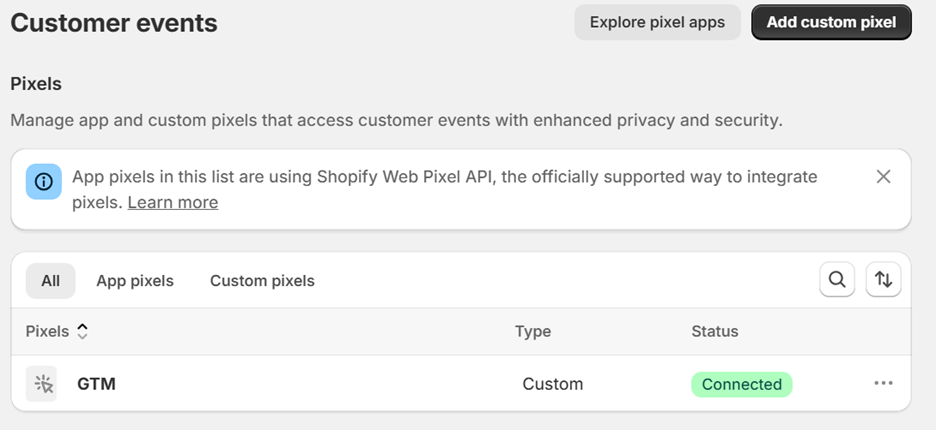
2. Adding a custom pixel to your store
- Navigate to your Shopify Admin dashboard.
- From the Settings menu, select the Customer Events tab on the left-hand side.
- Follow the instructions in the Customer Events section to add your custom pixel.
- Click on Add Custom Pixel.
- Enter the Pixel Name according to your requirements.
- Once completed, click Save to apply the changes.
3. Setting permissions for the pixel
- Under the Customer Privacy settings, select Not Required, as consumer privacy is managed by our CMP banner.
- For the Data Sale option, choosing Data collected does not qualify as data sale, as we do not permit our data for sale.

4. Setting up the events (code)
Follow the steps below to configure the events via code:
- Insert the appropriate event tracking code into a custom pixel.
- Ensure that the code is structured to capture relevant customer events and transmit the data to GA (or the platform of your choice).
- Test the functionality of each event to confirm proper setup and tracking.
- Below code consists of all the standard ecommerce events.
Note: Remember to change/replace GTM_CONTAINER_ID with your container ID in the code.
window.dataLayer = window.dataLayer || [];
function gtag(){dataLayer.push(arguments);}

(function(w,d,s,l,i){w[l]=w[l]||[];w[l].push({'gtm.start':
new Date().getTime(),event:'gtm.js'});var f=d.getElementsByTagName(s)[0],
j=d.createElement(s),dl=l!='dataLayer'?'&l='+l:'';j.async=true;j.src=
'https://www.googletagmanager.com/gtm.js?id='+i+dl;f.parentNode.insertBefore(j,f);
})(window,document,'script','dataLayer', 'GTM_CONTAINER_ID');

analytics.subscribe("checkout_completed", (event) => {
  dataLayer.push({ ecommerce: null });
  const items = event.data?.checkout?.lineItems?.map((item) => {
    return {
      item_id: item.variant.product.id,
      item_name: item.variant.product.title,
      price: item.variant.price.amount,
      quantity: item.quantity
    }
  });
  dataLayer.push({
    event: "purchase",
    url: event.context.document.location.href,
    ecommerce: {
      currency: event.data?.checkout?.currencyCode,
      value: event.data?.checkout?.subtotalPrice?.amount,
      transaction_id: event.data?.checkout?.order?.id,
      coupon: event.data?.checkout?.discountAllocations,
      shipping: event.data?.checkout?.shippingLine?.price?.amount,
      tax: event.data?.checkout?.totalTax?.amount,
      items: items
    }
  });
});

analytics.subscribe("payment_info_submitted", (event) => {
  dataLayer.push({ ecommerce: null });
  const items = event.data?.checkout?.lineItems?.map((item) => {
    return {
      item_id: item.variant.product.id,
      item_name: item.variant.product.title,
      price: item.variant.price.amount,
      quantity: item.quantity
    }
  });
  dataLayer.push({
    event: "add_payment_info",
    url: event.context.document.location.href,
    ecommerce: {
      currency: event.data?.checkout?.currencyCode,
      value: event.data?.checkout?.subtotalPrice?.amount,
      items: items
    }
  });
});

analytics.subscribe("checkout_shipping_info_submitted", (event) => {
  dataLayer.push({ ecommerce: null });
  const items = event.data?.checkout?.lineItems?.map((item) => {
    return {
      item_id: item.variant.product.id,
      item_name: item.variant.product.title,
      price: item.variant.price.amount,
      quantity: item.quantity
    }
  });
  dataLayer.push({
    event: "add_shipping_info",
    url: event.context.document.location.href,
    ecommerce: {
      currency: event.data?.checkout?.currencyCode,
      value: event.data?.checkout?.subtotalPrice?.amount,
      items: items
    }
  });
});

analytics.subscribe("checkout_started", (event) => {
  dataLayer.push({ ecommerce: null });
  const items = event.data?.checkout?.lineItems?.map((item) => {
    return {
      item_id: item.variant.product.id,
      item_name: item.variant.product.title,
      price: item.variant.price.amount,
      quantity: item.quantity
    }
  });
  dataLayer.push({
    event: "begin_checkout",
    url: event.context.document.location.href,
    ecommerce: {
      currency: event.data?.checkout?.currencyCode,
      value: event.data?.checkout?.subtotalPrice?.amount,
      items: items
    }
  });
});

analytics.subscribe("cart_viewed", (event) => {
  dataLayer.push({ ecommerce: null });
  const items = event.data?.cart?.lines?.map((item) => {
    return {
      item_id: item.merchandise.product.id,
      item_name: item.merchandise.product.title,
      price: item.merchandise.price.amount,
      quantity: item.quantity
    }
  });
  dataLayer.push({
    event: "view_cart",
    url: event.context.document.location.href,
    ecommerce: {
      currency: event.data?.cart?.cost?.totalAmount?.currencyCode,
      value: event.data?.cart?.cost?.totalAmount?.amount,
      items: items
    }
  });
});

analytics.subscribe("product_added_to_cart", (event) => {
  dataLayer.push({ ecommerce: null });
  dataLayer.push({
    event: "add_to_cart",
    url: event.context.document.location.href,
    ecommerce: {
      currency: event.data?.cartLine?.cost?.totalAmount?.currencyCode,
      value: event.data?.cartLine?.cost?.totalAmount?.amount,
      items: [
      {
        item_id: event.data?.cartLine?.merchandise?.product?.id,
        item_name: event.data?.cartLine?.merchandise?.product?.title,
        price: event.data?.cartLine?.merchandise?.price?.amount,
        quantity: event.data?.cartLine?.quantity
      }
      ]
    }
  });
});

analytics.subscribe("product_viewed", (event) => {
  dataLayer.push({ ecommerce: null });
  dataLayer.push({
    event: "view_item",
    url: event.context.document.location.href,
    ecommerce: {
      currency: event.data?.productVariant?.price?.currencyCode,
      value: event.data?.productVariant?.price?.amount,
      items: [
      {
        item_id: event.data?.productVariant?.product?.id,
        item_name: event.data?.productVariant?.product?.title,
        price: event.data?.productVariant?.price?.amount,
        quantity: 1
      }
      ]
    }
  });
});

analytics.subscribe("page_viewed", (event) => {
  window.dataLayer.push({
    event: "shopify_page_view",
  });
});
5. Connecting and testing the custom pixel
After adding the code, you can now connect the custom pixel. Once connected, proceed to test its functionality to ensure it is tracking events as expected.